
Do not stop your VM by using Linux commands, such as
shutdown or halt. Compute considers this as a failure, reboots the VM automatically and continues charging for this VM. Use Nebius AI Cloud interfaces instead and follow the instructions below.Prerequisites
If you use the web console, you don’t need to complete any prerequisites.- CLI
- Go SDK
- Python SDK
- JavaScript SDK
How to stop and start VMs manually
- Web console
- CLI
- Go SDK
- Python SDK
- JavaScript SDK
-
In the sidebar, go to
 Compute → Virtual machines.
-
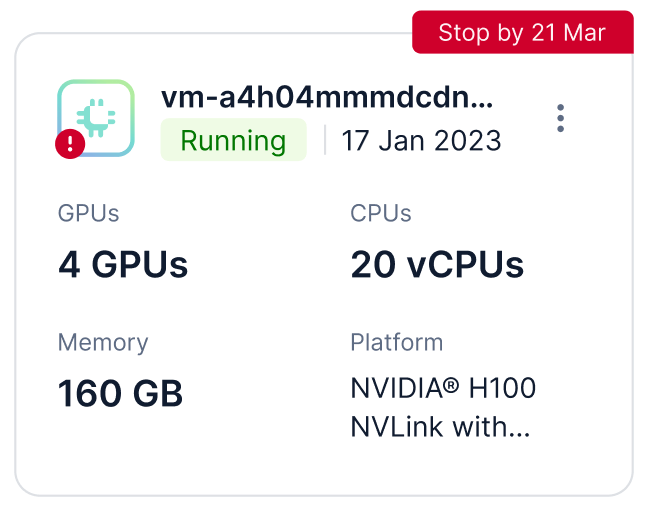
On the Standalone VMs tab, find VMs with the maintenance label.
Example
-
Click
 → Stop for these VMs.
- In the window that opens, confirm stopping the VM.
-
When the VM status changes to Stopped, click → Start.
- In the window that opens, confirm starting the VM.
-
Check whether maintenance is scheduled for a VM:
If the output contains the
nebius compute instance get --id <VM_ID>status.maintenance_event_idparameter, this means that you need to stop and start this VM. -
Stop the VM:
nebius compute instance stop --id <VM_ID> -
Start the VM:
nebius compute instance start --id <VM_ID>
-
Check whether maintenance is scheduled for a VM:
If the response contains a maintenance event ID in the VM status, stop and start this VM.
instance, err := sdk.Services().Compute().V1(). Instance().Get( ctx, &compute.GetInstanceRequest{ Id: "<VM_ID>", }, ) if err != nil { return err } fmt.Println(instance) -
Stop the VM:
stopInstanceOperation, err := sdk.Services().Compute().V1(). Instance().Stop( ctx, &compute.StopInstanceRequest{ Id: "<VM_ID>", }, ) if err != nil { return err } if _, err = stopInstanceOperation.Wait(ctx); err != nil { return err } -
Start the VM:
startOperation, err := sdk.Services().Compute().V1().
    Instance().Start(
        ctx,
        &compute.StartInstanceRequest{
            Id: "<VM_ID>",
        },
    )
if err != nil {
    return err
}
if _, err = startOperation.Wait(ctx); err != nil {
    return err
}
-
Check whether maintenance is scheduled for a VM:
If the response contains a maintenance event ID in the VM status, stop and start this VM.
instance_service = InstanceServiceClient(sdk) instance = await instance_service.get( GetInstanceRequest(id="<VM_ID>"), ) print(instance) -
Stop the VM:
instance_service = InstanceServiceClient(sdk) stop_instance_operation = await instance_service.stop( StopInstanceRequest(id="<VM_ID>"), ) await stop_instance_operation.wait() -
Start the VM:
instance_service = InstanceServiceClient(sdk)
start_instance_operation = await instance_service.start(
    StartInstanceRequest(id="<VM_ID>"),
)
await start_instance_operation.wait()
-
Check whether maintenance is scheduled for a VM:
If the response contains a maintenance event ID in the VM status, stop and start this VM.
const getInstanceService = new InstanceService(sdk); const instance = await getInstanceService.get( GetInstanceRequest.create({ id: "<VM_ID>", }), ); console.log(instance); -
Stop the VM:
const stopInstanceService = new InstanceService(sdk); const stopInstanceOperation = await stopInstanceService.stop( StopInstanceRequest.create({ id: "<VM_ID>", }), ).result; await stopInstanceOperation.wait(); -
Start the VM:
const startInstanceService = new InstanceService(sdk);
const startInstanceOperation = await startInstanceService.start(
  StartInstanceRequest.create({
    id: "<VM_ID>",
  }),
).result;
await startInstanceOperation.wait();
How to stop and start VMs automatically by using autohealing
You can create a VM with the autohealing function. It allows a VM to automatically stop and start each time maintenance is scheduled. As a result, the applications on this VM are highly available.Use autohealing only if the automatic VM shutdown is safe for the workloads on this VM. If you cannot stop the VM at any time, it is better to manage the VM manually.
-
Make sure you are in a group that has the
adminrole within your tenant or project; for example, the defaultadminsgroup. You can check this in the Administration → IAM section of the web console. - Create a service account.
-
Add it to the default
viewersgroup:- CLI
- Go SDK
- Python SDK
- JavaScript SDK
-
Get the ID of the
viewersgroup:In the command, specify your Tenant ID.nebius iam group get-by-name --name viewers \ --parent-id <tenant_ID> \ --format jsonpath='{.metadata.id}' -
Get the ID of the service account:
nebius iam service-account get-by-name \ --name <service_account_name> \ --format jsonpath='{.metadata.id}' -
Add the service account to the
viewersgroup:nebius iam group-membership create \ --parent-id <viewers_group_ID> \ --member-id <service_account_ID>
-
Get the ID of the
viewersgroup:In the code, specify your tenant ID.viewersGroup, err := sdk.Services().IAM().V1(). Group().GetByName( ctx, &iam.GetGroupByNameRequest{ ParentId: "<tenant_ID>", Name: "viewers", }, ) if err != nil { return err } viewersID := viewersGroup.GetMetadata().GetId() if viewersID == "" { return errors.New("viewers group ID is missing") } -
Get the ID of the service account:
In the code, specify the service account name.
serviceAccount, err := sdk.Services().IAM().V1(). ServiceAccount().GetByName( ctx, &iam.GetServiceAccountByNameRequest{ Name: "<service_account_name>", }, ) if err != nil { return err } serviceAccountID := serviceAccount.GetMetadata().GetId() if serviceAccountID == "" { return errors.New("service account ID is missing") } -
Add the service account to the
viewersgroup:In the code, specify the IDs of themembershipOperation, err := sdk.Services().IAM().V1(). GroupMembership().Create( ctx, &iam.CreateGroupMembershipRequest{ Metadata: &common.ResourceMetadata{ ParentId: "<viewers_group_ID>", }, Spec: &iam.GroupMembershipSpec{ MemberId: "<service_account_ID>", }, }, ) if err != nil { return err } if _, err = membershipOperation.Wait(ctx); err != nil { return err }viewersgroup and the service account.
-
Get the ID of the
viewersgroup:In the code, specify your tenant ID.group_service = GroupServiceClient(sdk) viewers_group = await group_service.get_by_name( GetGroupByNameRequest( parent_id="<tenant_ID>", name="viewers", ), ) viewers_id = viewers_group.metadata.id -
Get the ID of the service account:
In the code, specify the service account name.
service_account_service = ServiceAccountServiceClient(sdk) service_account = await service_account_service.get_by_name( GetServiceAccountByNameRequest(name="<service_account_name>"), ) service_account_id = service_account.metadata.id -
Add the service account to the
viewersgroup:In the code, specify the IDs of themembership_service = GroupMembershipServiceClient(sdk) membership_operation = await membership_service.create( CreateGroupMembershipRequest( metadata=ResourceMetadata(parent_id="<viewers_group_ID>"), spec=GroupMembershipSpec(member_id="<service_account_ID>"), ), ) await membership_operation.wait()viewersgroup and the service account.
-
Get the ID of the
viewersgroup:In the code, specify your tenant ID.const groupService = new GroupService(sdk); const viewersGroup = await groupService.getByName( GetGroupByNameRequest.create({ parentId: "<tenant_ID>", name: "viewers", }), ); const viewersId = viewersGroup.metadata?.id; if (!viewersId) { throw new Error("viewers group ID is missing"); } -
Get the ID of the service account:
In the code, specify the service account name.
const saService = new ServiceAccountService(sdk); const serviceAccount = await saService.getByName( GetServiceAccountByNameRequest.create({ name: "<service_account_name>", }), ); const serviceAccountId = serviceAccount.metadata?.id; if (!serviceAccountId) { throw new Error("service account ID is missing"); } -
Add the service account to the
viewersgroup:In the code, specify the IDs of theconst membershipService = new GroupMembershipService(sdk); const membershipOperation = await membershipService.create( CreateGroupMembershipRequest.create({ metadata: ResourceMetadata.create({ parentId: "<viewers_group_ID>", }), spec: GroupMembershipSpec.create({ memberId: "<service_account_ID>", }), }), ).result; await membershipOperation.wait();viewersgroup and the service account.
-
Create a VM. In its configuration, specify the following:
- Settings that allow connections to this VM.
-
Created service account:
- CLI
- Go SDK
- Python SDK
- JavaScript SDK
nebius compute instance create \
  ... \
  --service-account-id <service_account_ID>
fsAttachMode := compute.AttachedFilesystemSpec_READ_WRITE existingFS := &compute.ExistingFilesystem{ Id: filesystemID, } fsType := &compute.AttachedFilesystemSpec_ExistingFilesystem{ ExistingFilesystem: existingFS, } instanceOperation, err := sdk.Services().Compute().V1(). Instance().Create( ctx, &compute.CreateInstanceRequest{ Metadata: &common.ResourceMetadata{ Name: "vm", }, Spec: &compute.InstanceSpec{ ServiceAccountId: "<service_account_ID>", Resources: &compute.ResourcesSpec{ Platform: "cpu-e2", Size: &compute.ResourcesSpec_Preset{ Preset: "2vcpu-8gb", }, }, BootDisk: &compute.AttachedDiskSpec{ AttachMode: compute.AttachedDiskSpec_READ_WRITE, Type: &compute.AttachedDiskSpec_ExistingDisk{ ExistingDisk: &compute.ExistingDisk{ Id: bootDiskID, }, }, }, Filesystems: []*compute.AttachedFilesystemSpec{ { AttachMode: fsAttachMode, MountTag: "filesystem-1", Type: fsType, }, }, NetworkInterfaces: []*compute.NetworkInterfaceSpec{ { Name: "eth0", SubnetId: subnetID, IpAddress: &compute.IPAddress{}, PublicIpAddress: &compute.PublicIPAddress{}, }, }, }, }, ) if err != nil { return err } if _, err = instanceOperation.Wait(ctx); err != nil { return err }instance_service = InstanceServiceClient(sdk) create_instance_operation = await instance_service.create( CreateInstanceRequest( metadata=ResourceMetadata(name="vm"), spec=InstanceSpec( service_account_id="<service_account_ID>", resources=ResourcesSpec( platform="cpu-e2", preset="2vcpu-8gb", ), boot_disk=AttachedDiskSpec( attach_mode=AttachedDiskSpec.AttachMode.READ_WRITE, existing_disk=ExistingDisk(id=boot_disk_id), ), filesystems=[ AttachedFilesystemSpec( attach_mode=( AttachedFilesystemSpec.AttachMode.READ_WRITE ), existing_filesystem=ExistingFilesystem( id=filesystem_id, ), mount_tag="filesystem-1", ), ], network_interfaces=[ NetworkInterfaceSpec( name="eth0", subnet_id=subnet_id, ip_address=IPAddress(), public_ip_address=PublicIPAddress(), ), ], ), ), ) await create_instance_operation.wait()const createInstanceService = new InstanceService(sdk); const createInstanceOperation = await createInstanceService.create( CreateInstanceRequest.create({ metadata: ResourceMetadata.create({ name: "vm", }), spec: InstanceSpec.create({ serviceAccountId: "<service_account_ID>", resources: ResourcesSpec.create({ platform: "cpu-e2", size: { $case: "preset", preset: "2vcpu-8gb", }, }), bootDisk: AttachedDiskSpec.create({ attachMode: AttachedDiskSpec_AttachMode.READ_WRITE, type: { $case: "existingDisk", existingDisk: ExistingDisk.create({ id: bootDiskId, }), }, }), filesystems: [ AttachedFilesystemSpec.create({ attachMode: AttachedFilesystemSpec_AttachMode.READ_WRITE, mountTag: "filesystem-1", type: { $case: "existingFilesystem", existingFilesystem: ExistingFilesystem.create({ id: filesystemId, }), }, }), ], networkInterfaces: [ NetworkInterfaceSpec.create({ name: "eth0", subnetId: subnetId, ipAddress: IPAddress.create({}), publicIpAddress: PublicIPAddress.create({}), }), ], }), }), ).result; await createInstanceOperation.wait();
- Connect to the VM.
-
Install
jqon the VM:sudo apt-get install jqbrew install jq -
Go to the
/usr/local/bin/directory:cd /usr/local/bin/ -
Create the
vm_maintenance.shfile:sudo nano vm_maintenance.sh -
Add the following Bash script to the file:
#!/bin/bash INSTANCE_ID_FILE="/mnt/cloud-metadata/instance-id" CHECK_INTERVAL=600 # 10 minutes in seconds # Check if the Nebius AI Cloud CLI is installed check_nebius_installed() { if ! command -v nebius &> /dev/null; then echo "$(date) - Nebius utility not found, exiting..." exit 1 fi } get_instance_id() { if [[ -f "$INSTANCE_ID_FILE" ]]; then cat "$INSTANCE_ID_FILE" else echo "File with the virtual machine ID is not found" exit 1 fi } # Handle a maintenance event handle_maintenance_event() { # Add custom actions before stopping the virtual machine echo "$(date) - Custom actions before stopping the virtual machine" sudo shutdown -h +1 "Restarting virtual machine due to maintenance" } check_nebius_installed # main loop while true; do INSTANCE_ID=$(get_instance_id) if [[ -z "$INSTANCE_ID" ]]; then echo "Virtual machine ID is empty" exit 1 fi RESPONSE=$(nebius compute instance get --id "$INSTANCE_ID" --format json) if echo "$RESPONSE" | jq -e '.status.maintenance_event_id' >/dev/null; then echo "$(date) - Maintenance event detected" handle_maintenance_event else echo "$(date) - No maintenance event detected" fi sleep "$CHECK_INTERVAL" done -
Make the file executable:
sudo chmod +x /usr/local/bin/vm_maintenance.sh -
To make the script run continuously and restart it when the VM fails or reboots, add a
systemdunit to the script:sudo bash -c 'cat > /etc/systemd/system/vm_maintenance.service << EOF [Unit] Description=VM Maintenance Event Handler After=network.target [Service] ExecStart=/usr/local/bin/vm_maintenance.sh Restart=always User=root Environment=PATH=/usr/local/sbin:/usr/local/bin:/usr/sbin:/usr/bin:/sbin:/bin WorkingDirectory=/usr/local/bin StandardOutput=append:/var/log/vm_maintenance.log StandardError=append:/var/log/vm_maintenance.log [Install] WantedBy=multi-user.target EOF' -
Start the service created with the
systemdunit, and let it restart in case of the VM reboot:The output example is the following:sudo systemctl daemon-reload sudo systemctl start vm_maintenance sudo systemctl enable vm_maintenance sudo systemctl status vm_maintenanceCreated symlink /etc/systemd/system/multi-user.target.wants/vm_maintenance.service → /etc/systemd/system/vm_maintenance.service. ● vm_maintenance.service - VM Maintenance Event Handler Loaded: loaded (/etc/systemd/system/vm_maintenance.service; enabled; vendor preset: enabled) Active: active (running) since Fri 2025-04-25 10:19:19 UTC; 214ms ago Main PID: 28530 (vm_maintenance.) Tasks: 6 (limit: 19056) Memory: 24.3M CPU: 25ms CGroup: /system.slice/vm_maintenance.service ├─28530 /bin/bash /usr/local/bin/vm_maintenance.sh └─28535 nebius compute instance get --id computeinstance-*** --format json Apr 25 10:19:19 computeinstance-*** systemd[1]: Started VM Maintenance Event Handler.